Water Leaking Into Your Caravan Through the Front Seal? How to Fix It
You've just picked up your new van, headed out in the rain, and come home to find water inside. The front seal is bowing, there's a visible gap, and water is getting through when you tow. It's frustrating — but you're not alone. This is one of the most common issues new caravan owners discover, and it's usually fixable.
Here's what causes it, how to fix it, and when to push back on the manufacturer.
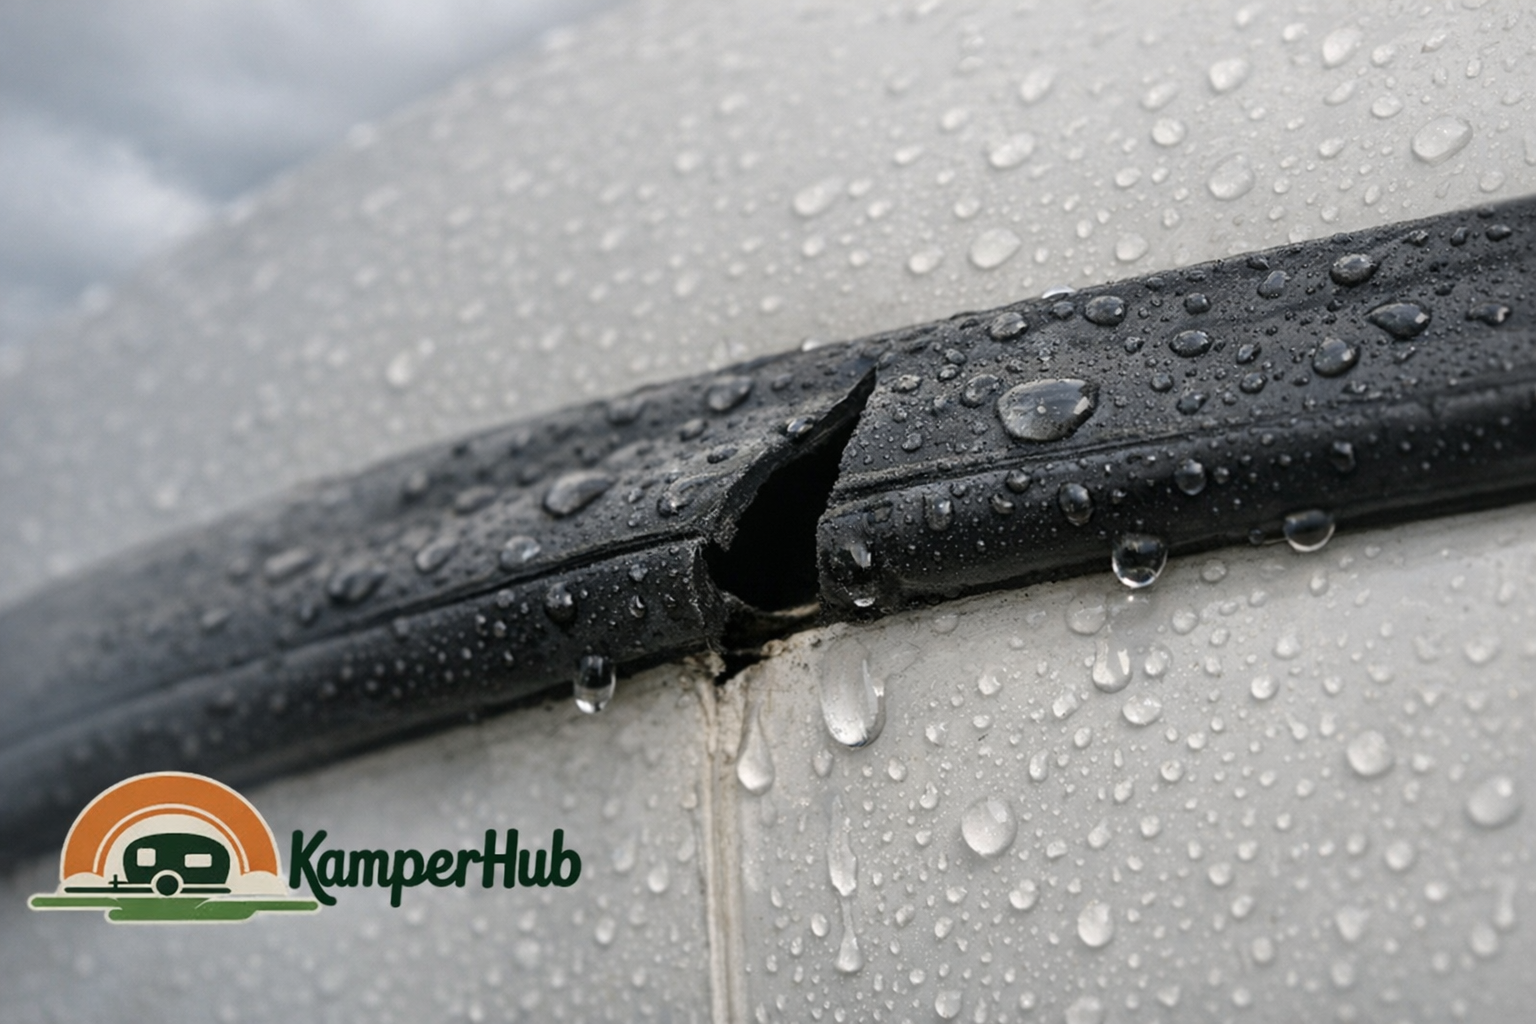
Why the Front Seal Bows
When you're towing at highway speed, wind pressure pushes against the front wall of your caravan. On many modern lightweight vans, this causes the front wall to flex slightly inward. That flex pulls the seal away from the tow vehicle or front panel, creating a gap.
The seal is supposed to compress and maintain contact through this movement. But if:
- The seal profile is wrong for the gap size
- The seal wasn't seated properly at the factory
- The front wall is too flexible (common on thinner composite panels)
- The seal has hardened or shrunk over time
...you end up with a bow and water pouring in at speed.
This is especially noticeable on:
- Pop-top caravans (the front seal does double duty)
- Vans with front tunnel boots (the boot lid join adds another leak point)
- Lightweight vans under 1,500kg ATM (thinner wall panels flex more)
How to Diagnose the Problem
Planning your next road trip?
KamperHub helps you plan routes, track weights, and travel with confidence. Free to use — no credit card required.
Get Started FreeBefore you fix anything, work out exactly where the water is coming in.
The Hose Test
- Close everything up and have someone sit inside the van
- Starting from the bottom, slowly run a hose along the front seals and joins
- Work your way up section by section
- The person inside marks where water appears
This tells you whether it's the main front seal, the boot lid seal, a panel join, or a window seal.
Check the Seal Contact
With the van hitched and level:
- Run your finger along the front seal from inside
- Press gently — can you feel gaps or areas where the seal doesn't contact?
- Look for daylight coming through (best checked in a dark garage with a torch outside)
Check for Wall Flex
- Push on the front wall from inside. Does it move more than a few millimetres?
- Excessive flex means the wall panel may need reinforcing (a bigger job — talk to your dealer)
Fix 1: Reseat the Existing Seal
Sometimes the seal has simply come out of its channel or isn't seated evenly.
What to do:
- Carefully pull the seal out of its channel
- Clean the channel — remove old adhesive, dirt, and grime
- Check the seal for cracks, hardening, or permanent deformation
- If the seal looks good, push it back in firmly and evenly
- Use a rubber mallet or roller to press it fully into the channel
Cost: Free if the seal is in good condition
Fix 2: Add Foam Backing Tape
If the seal sits in the channel but doesn't compress enough to fill the gap, foam backing tape behind the seal can push it out further.
What to do:
- Remove the seal from its channel
- Apply closed-cell foam tape (5–10mm, depending on your gap) along the back of the channel
- Reseat the seal on top of the foam
- The foam pushes the seal outward, increasing compression against the mating surface
Cost: $10–$20 for a roll of closed-cell foam tape from Bunnings or Clark Rubber
Fix 3: Upgrade the Seal Profile
Not all seals are created equal. If your van came with a basic blade seal, upgrading to a bulb seal or a P-profile seal can make a big difference. Bulb seals compress more and maintain contact over a wider range of gap sizes.
What to do:
- Measure your current seal channel width (usually 4mm, 6mm, or 8mm)
- Measure the gap the seal needs to bridge
- Order a bulb or P-profile seal to suit — available from caravan seal suppliers or rubber specialists like Clark Rubber
- Remove the old seal and press the new one in
Common seal profiles:
- Blade seal — flat rubber strip, limited compression range
- Bulb seal — round bulb on a stem, compresses well over varying gaps
- P-profile — hollow P shape, good compression and water shedding
- D-profile — similar to P but with a flat back for adhesive mounting
Cost: $5–$15 per metre depending on profile
Fix 4: Apply Sealant to Panel Joins
Water doesn't always come through the seal itself. It can enter through:
- The join between the front wall and the roof
- Screw holes in the front panel
- The front boot lid frame
- Corner mouldings where panels meet
What to do:
- Inspect all panel joins on the front of the van — look for gaps, cracked sealant, or missing sealant
- Clean the joint with methylated spirits
- Apply a bead of Sikaflex 252 or Sikaflex 221 (both are common in caravan manufacturing)
- Smooth the bead with a wet finger or sealant tool
- Let it cure for 24 hours before towing
Important: Don't use silicone sealant on caravan panels — it doesn't bond well to composite materials and goes mouldy. Sikaflex or a polyurethane sealant is the right choice.
Cost: $15–$25 for a tube of Sikaflex
Fix 5: Fit a Front Stone Guard or Deflector
A front stone guard (also called a deflector or wind deflector) creates a buffer between the tow vehicle and the caravan front wall. It reduces wind pressure on the front wall and prevents direct rain impact on the seal.
Bonus: It also protects the front panel from stone chips.
Cost: $200–$600 fitted, depending on the style and size
When It's a Warranty Issue
If your caravan is new or under warranty, do not attempt major seal repairs yourself — document everything first.
Push back on the dealer/manufacturer if:
- The van is less than 12 months old and the seal was bowing from the first tow
- The front wall is flexing excessively (this is a structural issue, not a seal issue)
- Water is entering through panel joins that were never sealed at the factory
- The seal profile fitted is clearly wrong for the gap size
What to do:
- Take photos and video of the bow, the gap, and the water ingress
- Do the hose test and record where water enters
- Write to the dealer in writing (email, not just a phone call) with your evidence
- Reference the Australian Consumer Law — a caravan must be fit for purpose, which includes being waterproof when towed
- If the dealer won't help, contact the manufacturer directly and lodge a complaint with your state's Fair Trading or Consumer Affairs body
Tip: Join the Facebook group for your caravan brand — you'll quickly find out if it's a known issue across that model. If multiple owners have the same problem, the manufacturer is far more likely to act.
Prevention: Keeping Seals Healthy
Once you've fixed the leak, keep it fixed:
- Clean seals every few months with warm soapy water — dirt and grime accelerate wear
- Apply silicone spray or rubber conditioner to seals twice a year to keep them supple
- Check seals before every trip — a 30-second visual check can save thousands in water damage
- Don't park under trees long-term — sap and bird droppings degrade rubber seals
- Store with the front cover on if you have one — UV exposure hardens rubber over time
Quick Reference
| Problem | Likely Cause | Fix |
|---|---|---|
| Seal bowing inward | Wind pressure + wall flex | Foam backing tape or seal upgrade |
| Gap visible with seal in place | Wrong seal profile | Upgrade to bulb or P-profile |
| Water at panel joins | Missing or cracked sealant | Apply Sikaflex to joins |
| Water at boot lid | Boot seal worn or misaligned | Reseat or replace boot seal |
| Excessive wall flex | Thin panel construction | Dealer/warranty — may need reinforcing |
Check Your Setup
Before your next trip, make sure the rest of your setup is sorted too. Our free Pre-Departure Towing Checklist covers 39 safety checks including seals, lights, tyres, and weights — so nothing gets missed.
New to caravanning? Our Weight Compliance Calculator helps you make sure you're not overloading your van, which can make wall flex and seal problems worse.
Useful Resources
Join the Conversation
Found this helpful? Try KamperHub — it's free
Weight tracking, trip planning, and towing compliance — all in one app.
KamperHub Team
Helping travellers tow safely and confidently. KamperHub provides tools for trip planning, weight compliance, and adventure management.
Plan Your Next Caravan Adventure with KamperHub
Trip planning, weight tracking, fuel management, and more. Everything you need for safe and confident towing.
Get Started Free